
Departments
Search
Follow Us
Tags
Latest Highlights
IBH

How to Take Great Pictures of Handmade Jewelry Unique Earrings Handcrafted Bracelets
Great photography is a necessity when you have a handmade jewelry website. Unfortunately, handcrafted jewelry is very difficult to photograph. Many jewelry artisans cannot afford to go to a professional and so they want to do it themselves. There are some simple techniques that even amateur photographers can use to obtain better results with minimal effort. The following examples show the basic setup that should allow anyone to achieve results they can be proud of.
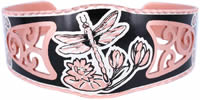
Wildlife Jewelry Dragonfly Bracelets, Handmade Bracelets, Unique Handcrafted Jewelry
In the olden days we spent thousands of dollars on photo processing but nowadays we are so blessed with the digital camera. I could write an article just about the virtues of the digital camera. It does not have to be the top of the line professional camera anymore as most digital cameras have a macro feature which is specifically for photographing small objects like handmade earrings and handmade bracelets. It is worthwhile to read your camera manual to learn how to put the camera in macro mode.
The keys to good handmade jewelry photography are sharpness, lighting and exposure. The macro lens is a big help for the sharpness factor. Another key to a sharp image is a tripod. It is absolutely essential to use a tripod or similar camera support when taking pictures of handcrafted jewelry. A sturdy tripod is better than a flimsy one, but any tripod is many times better than no tripod. Always use a tripod and your photos will be sharp.
If you are thinking of investing in a new digital camera just for photographing your handmade jewelry one of the most convenient features we use constantly is a direct camera to computer cable. We adjust all the settings from the computer and press the space bar to take the picture. No more shaking or movement of any kind and all the settings are the same every time. Technology makes our lives much easier.
The second key to great handmade jewelry photography is the lighting. Normally diffuse (soft) lighting works best for jewelry. You have probably already discovered that an on-camera flash does not lead to good photos. Not only is the flash too bright at such a close distance, it will also create bright spots and distracting shadows. Rather than flash it is better to use continuous lighting for photographing handmade earrings and handmade bracelets. Using daylight balanced bulbs for lighting provide natural-colored light. You can purchase these from photography suppliers. We use 5200 K bulbs which resembles daylight most closely. Even these lights will need to be diffused and for that use a light tent as the diffuser.
A small light tent makes it easy to reduce glare and control shadows for handcrafted jewelry photography. These are commercially available in a wide range of sizes and shapes, but are generally quite expensive. It is not difficult to make your own lighting tent from white rip-stop nylon material, a couple of metal coat hangers and double-sided tape. The light tent tends to soften the shadows and eliminate glare, while providing a clean and clutter free background.
Proper exposure is the last key to good handmade jewelry photography. If your background is actually white but appears grey in your image then the image has been underexposed. This means you need to let more light get to your camera’s image sensor. Adjust your camera exposure compensation setting to slightly overexpose the image. Nearly every digital camera has an exposure compensation setting, but you may need to read your camera user manual to find how to adjust yours. Once you locate the controls for exposure compensation simply increase the exposure until the image looks correct.
If you are comfortable with photography you can experiment with the settings for aperture and shutter speed to see how they affect the exposure. Once you find the perfect settings for your handmade jewelry you will find that you can easily adjust them for different pieces. We tend to take photos for new handmade earrings and handmade bracelets all at once so that everything is set up properly only once. You can also look at the settings on photos that you are happy with and keep the same settings each time.
Imaging software, even inexpensive software like Photoshop Elements™ can make handmade jewelry photography much easier. It may seem like it would be faster to use an image exactly as it was shot. But in reality, it is difficult to get your handmade earrings and handmade bracelets to look exactly how you would like it to appear. Imaging software allows you to crop an image, resize it, adjust the exposure, remove the background and even sharpen the images. I especially like the auto-enhance for just the right color balance.
We having been taking our own handmade jewelry photos for many years and just as it is with making our handmade earrings and handmade bracelets, it does get easier with time. I hope these suggestions help you to take great photos of your unique handcrafted jewelry.
ABOUT THE AUTHOR: The artisans of copperreflections.com have been making handmade jewelry, handcrafted jewelry, wholesale jewelry and unique gift ideas since 1985. We are specialized in animal jewelry, wildlife and Native American jewelry, each piece is carefully designed and handcrafted especially for you.
“This is an original article by Jennifer Hisir of Handmade Jewelry by Copper Reflections”
Tags: handcrafted jewelry, handmade bracelets, handmade earrings, handmade jewelry, jewellery, jewelry, photography tips, unique jewelry, wholesale jewelry
Posted in Handmade Harbor
2 Responses to “How to Take Great Pictures of Handmade Jewelry Unique Earrings Handcrafted Bracelets”
Leave a Reply
You must be logged in to post a comment.
Great suggestions, thanks!
Thank you for this. Photos are one of my big problems. Sometimes I get it perfect, but can never remember what I did.
I had made a light box but my backgrounds were coming out yellow. Now I think I understand why and will try again.