What’s In a Name – or a Label?
If you work in fiber for any age group or gender, there are regulations on what needs to be affixed to your finished product. This is especially true if your target market is children.
The US Government doesn’t see that stuffed animal, that dress, that blanket/quilt, that hat as ‘art.’ They see it as a manufactured product which must be labeled. Their stance is that the ultimate consumer must know who to contact in the event of a product failure. They also require labeling sufficient for the manufacturer (artist) to identify which of their products may be involved in a recall.
Some of the things that are required on the label are the manufacturer’s name, location and date of manufacture, contents and care instructions.
When I first started out, I thought, “What a COLOSSAL pain!” And, in fact, all these labeling requirements forced many, many people out of business when they took effect. But you may already know how stubborn I can be…..
Labeling has evolved over my time in business; both the process and the mind-set. I’ve worked really hard to market my shop and my brand. I’ve labored to have the name, iKnitQuiltSew, mean quality, durability, style and value. All of a sudden, my label may be the most important element of any piece I produce. How does the buyer care for this item? Who made it? Where can I get more of these? What’s it made of? All of these questions are answered on my label.
My labels started out on off-white blanket binding. It worked, but it was so big and the edges frayed so easily. The latter required a lot of finishing. The whole process was such a chore and I needed to streamline and simplify. I’ve finally gotten it down to professional looking and manageable. So here’s how you can do it too!
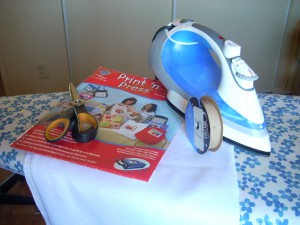 You will need an iron and ironing board, scissors, computer/printer/scanner, iron-on transfer paper, photo software, light colored satin ribbon (I use white 5/8″ wide) and a sewing machine or needle & thread. The first thing to do is compose the contents of your label, remembering that there’s a front and a back. The front of my label has my shop name (with the copyright symbol), my zip code (location of manufacture), USA, the month/year of completion, and my shop website address. The back of my label has care instructions and item material content. There’s nothing preventing you from using interesting fonts and colors, but don’t get too carried away – you’re working in a really small space.
If you lay your file out in columns, you should be able to get three or four labels across, and the column structure will make them all the same size. Type the front of the label first, skip one line, then type the back. This will give you ample room for cutting later.
Once you’re happy with your text, print your label(s) on bright white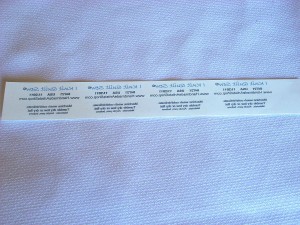 paper (that way the background won’t scan) at a good resolution (I change my printer to the “text with photo” setting). Once it’s printed, scan it to turn it into a .jpg. Open the .jpg with your photo software and flip it horizontally. It needs to be backwards on the transfer paper so that it will print frontward on your label. Then, open a new text document and place the picture in it. Set the margins as narrow as you can to cut down on wasting transfer paper, then resize the image to fit your ribbon. The rulers on the side and top of the screen are a huge help when doing this! When your happy, print this on transfer paper. You should have something that looks like this:
Now cut out each front and back label so that you’re left with lots of little pieces.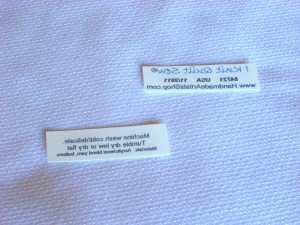
Place the labels face down on your ribbon about 1″ from the end. Make sure they’re straight! The transfer paper I use requires a hot iron with no steam. Be sure to follow the directions on your transfer paper for good adhesion. My transfer paper requires heat for 20 seconds, and I’ve never had a problem scorching the ribbon during this step. Here’s what the label looks like after ironing and peeling off the backing.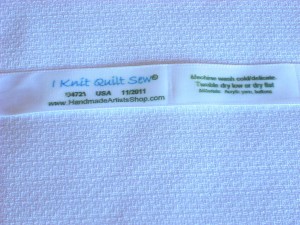
Once the label has cooled, fold it in half. Turn the cut edges together toward the back twice (this gets the unfinished edge inside), then stitch it in place with a sewing machine or by hand.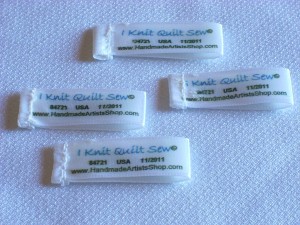
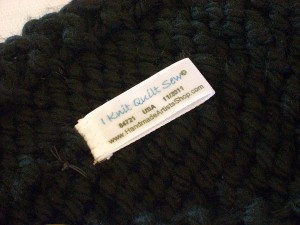
Now all that’s left to do is to sew it into your item, making it truly finished!
Tags: branding, care instructions, Handmade, Handmade Harbor, knitting, Labels, tags, tutorial
Posted in Creative Breakroom, Handmade Harbor, Information



Well written, thanks for sharing!
My pleasure! Thanks for posting it!
Great info!
Hi Sandi… Well I be a…. LOL I had know idea… very informative Sandi. Thanks
Best and most timely post ever! Thank you for this, seriously. I was wondering how to get labels going.
I am so happy that this was helpful to so many people! Thanks for taking the time to comment!
This is a truly wonderful article and well needed! Thank you so much!
Great article and explanation on how to, I would not have known….;o)