
Departments
Search
Follow Us
Tags
Latest Highlights
IBH

A Newbie’s View of Porcelain Painting
Do you love to decorate using vintage hand painted porcelain plates? When the shabby chic craze started, everyone was buying vintage/antique porcelain plates, hand painted with pretty pink roses. (I was one of them!) It was then that I decided I wanted to learn how to paint porcelain. I knew absolutely NOTHING about porcelain painting, but I did know that I needed a kiln. Still, knowing NOTHING, I went on Ebay and purchased a used kiln for $350. I went on the internet and found Maryland China. I purchased scads of white porcelain blanks, brushes and paint from them and I was all set to do porcelain painting…..except knowing what to do.
Porcelain painting has often been called a dying art mainly because many artists, or would be artists, are afraid to jump in because of the initial cost. Because of the need for access to a kiln, which is no small investment, and the cost and accessibility of porcelain paints and porcelain blanks, many artists shy away from porcelain painting. Porcelain blanks and porcelain paints are easily found on the internet, but when you’re starting out, with no one to guide you, it’s daunting to know what to choose.
So, sitting here with a kiln, paints, and porcelain blanks, I decided that I had better purchase a book! My first book was Pass Me Another Plate by Wanda Chapman. After that, I purchased a few dvd’s from Barbara Duncan, Barbara Duncan Art. I loved her style of painting and she paints the most gorgeous roses.
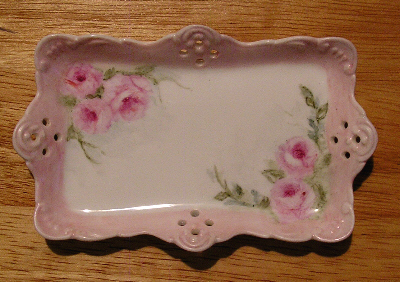
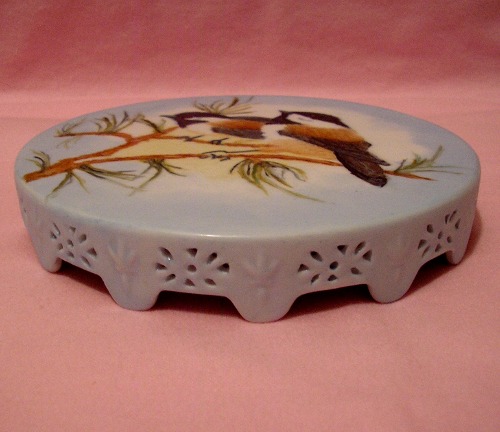
My very first piece was this pin tray. Not very good, but I keep it in my bathroom as a soap dish to remind me that I AM improving with each piece I paint.
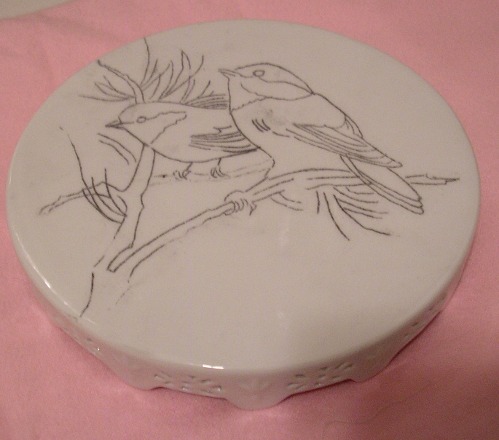
I had purchased a beautiful porcelain trivet blank and it was perfect for my next project. One of Barbara’s dvds was learning how to paint Chickadees.
First Step: The first step was to sketch the chickadees on the porcelain using a china pencil. The china pencil drawing will fire off with the first fire.
Second Step: This is the underpainting. I painted blue in the areas that were going to end up black. Painting in the color black has to be done in stages or else it will chip off if it’s painted to heavily in one firing. Once this was painted, I fired it in the kiln. Also, porcelain painting is a bit like painting with watercolors in that you must establish your highlights before the first fire.
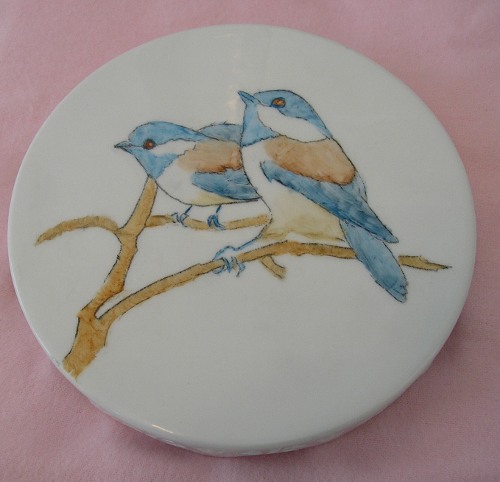
Using a kiln was a bit daunting also, but after a few trial fires, you’ll get the hang of it. The biggest challenge is to learn what temps to use in firing. Some colors need to be fired very hot and others need to be fired at a low temp.
Step Three: After the first fire, I then added the first layer of black and painted some of the brown colors on the chickadees and began painting the limbs and green needles of the branch.
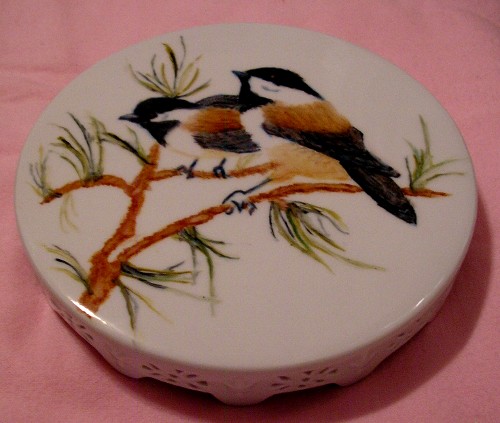
Step Four: After the second fire, I added the sky and established some highlights in the black feathers. Then it was time to fire for the third time.
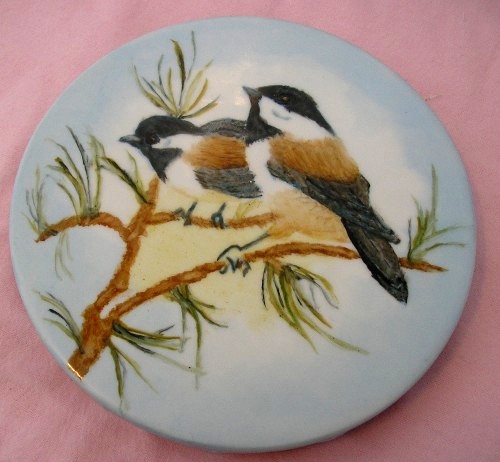
You may fire your piece as many times as necessary too achieve the depth of colors that you want.
And, yes….I still consider myself a “newbie” at porcelain painting. Even at age 65 and having several years of porcelain painting under my belt, I still have so much to learn. I hope that I’ve inspired you to try your hand at porcelain painting. If you have the desire, check in your area to see if anyone teaches porcelain painting. Since my first piece, I’ve found so many great resources and websites for those learning porcelain painting.
Written by MarilynKelleyArt
Tags: art, hand painted, Handmade, Handmade Artists, original, painting, porcelain
Posted in Handmade, Information
9 Responses to “A Newbie’s View of Porcelain Painting”
Leave a Reply
You must be logged in to post a comment.
Wow, that’s so awesome!!! Love hearing the process:) Beautiful Chickadees!
Very informative! Thanks for sharing Marilyn 😀
Marilyn… Fantastic article!
I totally agree with Beverly, reading about the process is SWEET! No more ‘I wonder how they do that?’ ;o)
I always wondered how these beautiful plates were handcrafted – your article was wonderful. Thanks so much for sharing!
Such an interesting read! I love learning new art your is wonderful!
Oh Marilyn, your first piece is gorgeous. My mother in law would love to have a piece like that. She loves pink roses. Your chickadee is also very lovely. It is amazing what we can teach ourselves if we have the will.
Thank you for all your kind comments. There is one more thing that I didn’t mention. Porcelain artists who have been at this for years, are always glad to take their time and help others learn the art. Learning the art without a teacher beside you just takes a bit more time and maybe a few more failures, but it can be done.
Your article was very interesting and your pieces are quite lovely. I have many pieces of antique hand painted porcelain and had not realized the amount of work that went into their creation.
I could I have missed this….beautiful Marilyn….